Adding customers in Load Manager TMS is essential for managing your business operations effectively, and accurate customer information is crucial for smooth transactions, billing, and communication. This guide provides a step-by-step process for adding a new customer to your account, ensuring you have the necessary permissions and customer details ready.
Before You Begin:
Ensure your account has the needed permissions to add customers. If you cannot see the "Add New Customer" option, contact your system administrator.
Make sure you have the necessary customer information ready, such as their company name, customer code, address, phone number, and email address.
Steps to Add a Customer
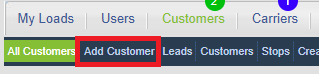
1. From the main dashboard, locate and click the "Customers" tab or menu item to enter the customer management area.
2. Click the "Add Customer" button located at the top left.
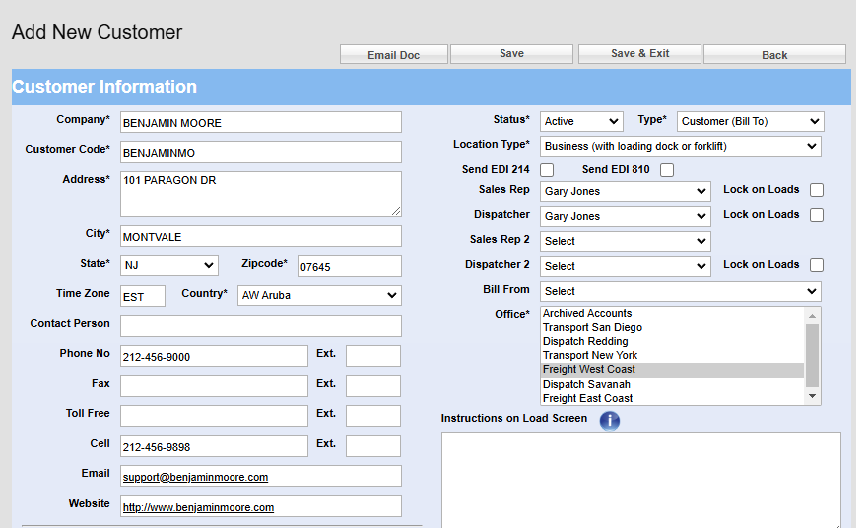
3. A form will appear. Fill in the required fields, which typically include:
The name of the individual or company.
The customer’s physical address.
A contact phone number.
A contact email address.
LoadManagerLoadManagerLoadManagerLoadManager
You may also see optional fields like fax number, website, or contact person—complete these as needed.
4. Once all required information is entered, click the "Save" or "Save & Exit" button. Your customer will then appear in your "Customer List"
Additional Notes
Ensure the customer isn't already in your "Customer List" to prevent duplicate entries.
If you encounter an error while saving, double-check that all required fields are filled out correctly.
Adding customers in Load Manager is a simple yet important task for managing your business operations effectively. By following the steps outlined in this guide, you ensure that your customer information is accurate and complete, which is crucial for smooth transactions, billing, and communication. For more advanced features or related topics, refer to the Load Manager knowledgebase.